Bootable disc
Creating a Microsoft Windows based boot disc
For data recovery or diagnostic purposes, you will probably prefer a Microsoft Windows based boot CD, which will allow you to perform various actions using a familiar graphical user interface.
CDBurnerXP can burn such a multipurpose boot disc, but first, you need to compile a boot disc. For a free method to create a compilation (requiring an original Microsoft Windows XP CD), check the Ultimate Boot CD for Windows tutorial (there are various tools included). You can burn the resulting ISO file using CDBurnerXP, or you can use the UBCD4Win PE Builder to burn the disc without saving an ISO file for later use.
If you do not have a Microsoft Windows XP CD or prefer a Windows 7 based boot disc, you might also be interested in a commercial version, like the Active@ Boot Disk.
Burning a bootable ISO image
If you want to burn a bootable ISO-image (like you get from BartPE or UltimateBootDisc for Windows), you have to use the burn ISO feature and not enable any boot options shown bellow.
Creating a custom boot disc
http://www.tacktech.com/display.cfm?ttid=415.
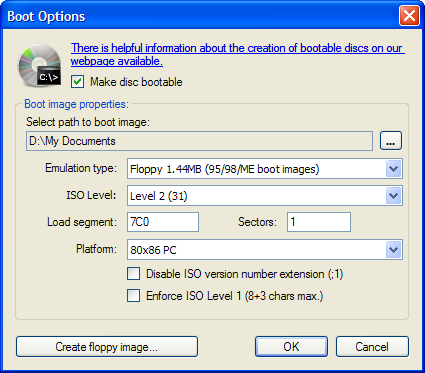
The Load segment field should probably be 7C0 (seven-c-zero) as shown below, for a Windows XP bootable disc.
To make a disc bootable, either use the menu (Disc → Boot Options) or click on the Boot Options button in the burning dialog.
Then check the box Make disc bootable.
Now you have to choose your boot image. You can either use one of your own, or you can download a boot image from our webpage with the most important DOS programs. As a last option, you can also create a boot image from a bootable floppy. To do that, press the “floppy image” button in the same dialog.
After you chose a suitable boot image, you have to choose the emulation type. Note that the size of the emulated medium has to be at least as big as the boot image you use. Otherwise it won't work. So for our boot image you have to use “Floppy 2.88MB”. The files which you have added (if any) to the CD layout in CDBurnerXP compilation window do not have any influence on what type of emulation you have to use. You can also choose other boot emulation types if you need them, but usually floppy emulation will do fine.
- “Bootable emulation” (Floppy/HD) causes the image to be mapped to drive A or C, as a conventional bootable storage device.
- “No emulation” is a special mode which loads the image into memory and executes it - extremely useful when developing copy protection or “smart” CDs designed for a variety of disparate systems. For example, the “no emulation” mode is used in the Windows NT operating system CDs.
For Windows NT/2000/XP boot images, disable ISO version number extension (;1) 1) and do enforce ISO Level 1 .
Note that after you made your disc bootable, the CD root icon in CD layout will get another symbol.
